Guide
How to Set Up OpenClaw on a VPS
Running OpenClaw on a VPS keeps your AI agent always on and accessible from anywhere. Ideal for Telegram and WhatsApp bots that need 24/7 uptime. This guide covers everything from server selection to remote management.
Quick Answer
5 steps: 1) Get a VPS ($3-10/month, Ubuntu 22.04+, 1GB RAM). 2) Install Node.js 20+ and OpenClaw. 3) Run openclaw doctor for initial setup. 4) Create a systemd service for auto-restart. 5) Connect from your desktop using ClawSquire (automatic) or SSH tunnel (manual). Total time: ~15 minutes.
Why Use a VPS?
- ✓ Always-on — agent runs 24/7 regardless of your desktop being open
- ✓ Accessible from anywhere — chat via Telegram, WhatsApp, or Discord from any device
- ✓ Better for bots — messaging platforms need a stable, always-reachable webhook endpoint
- ✓ Isolate from personal machine — agent actions don't touch your local files
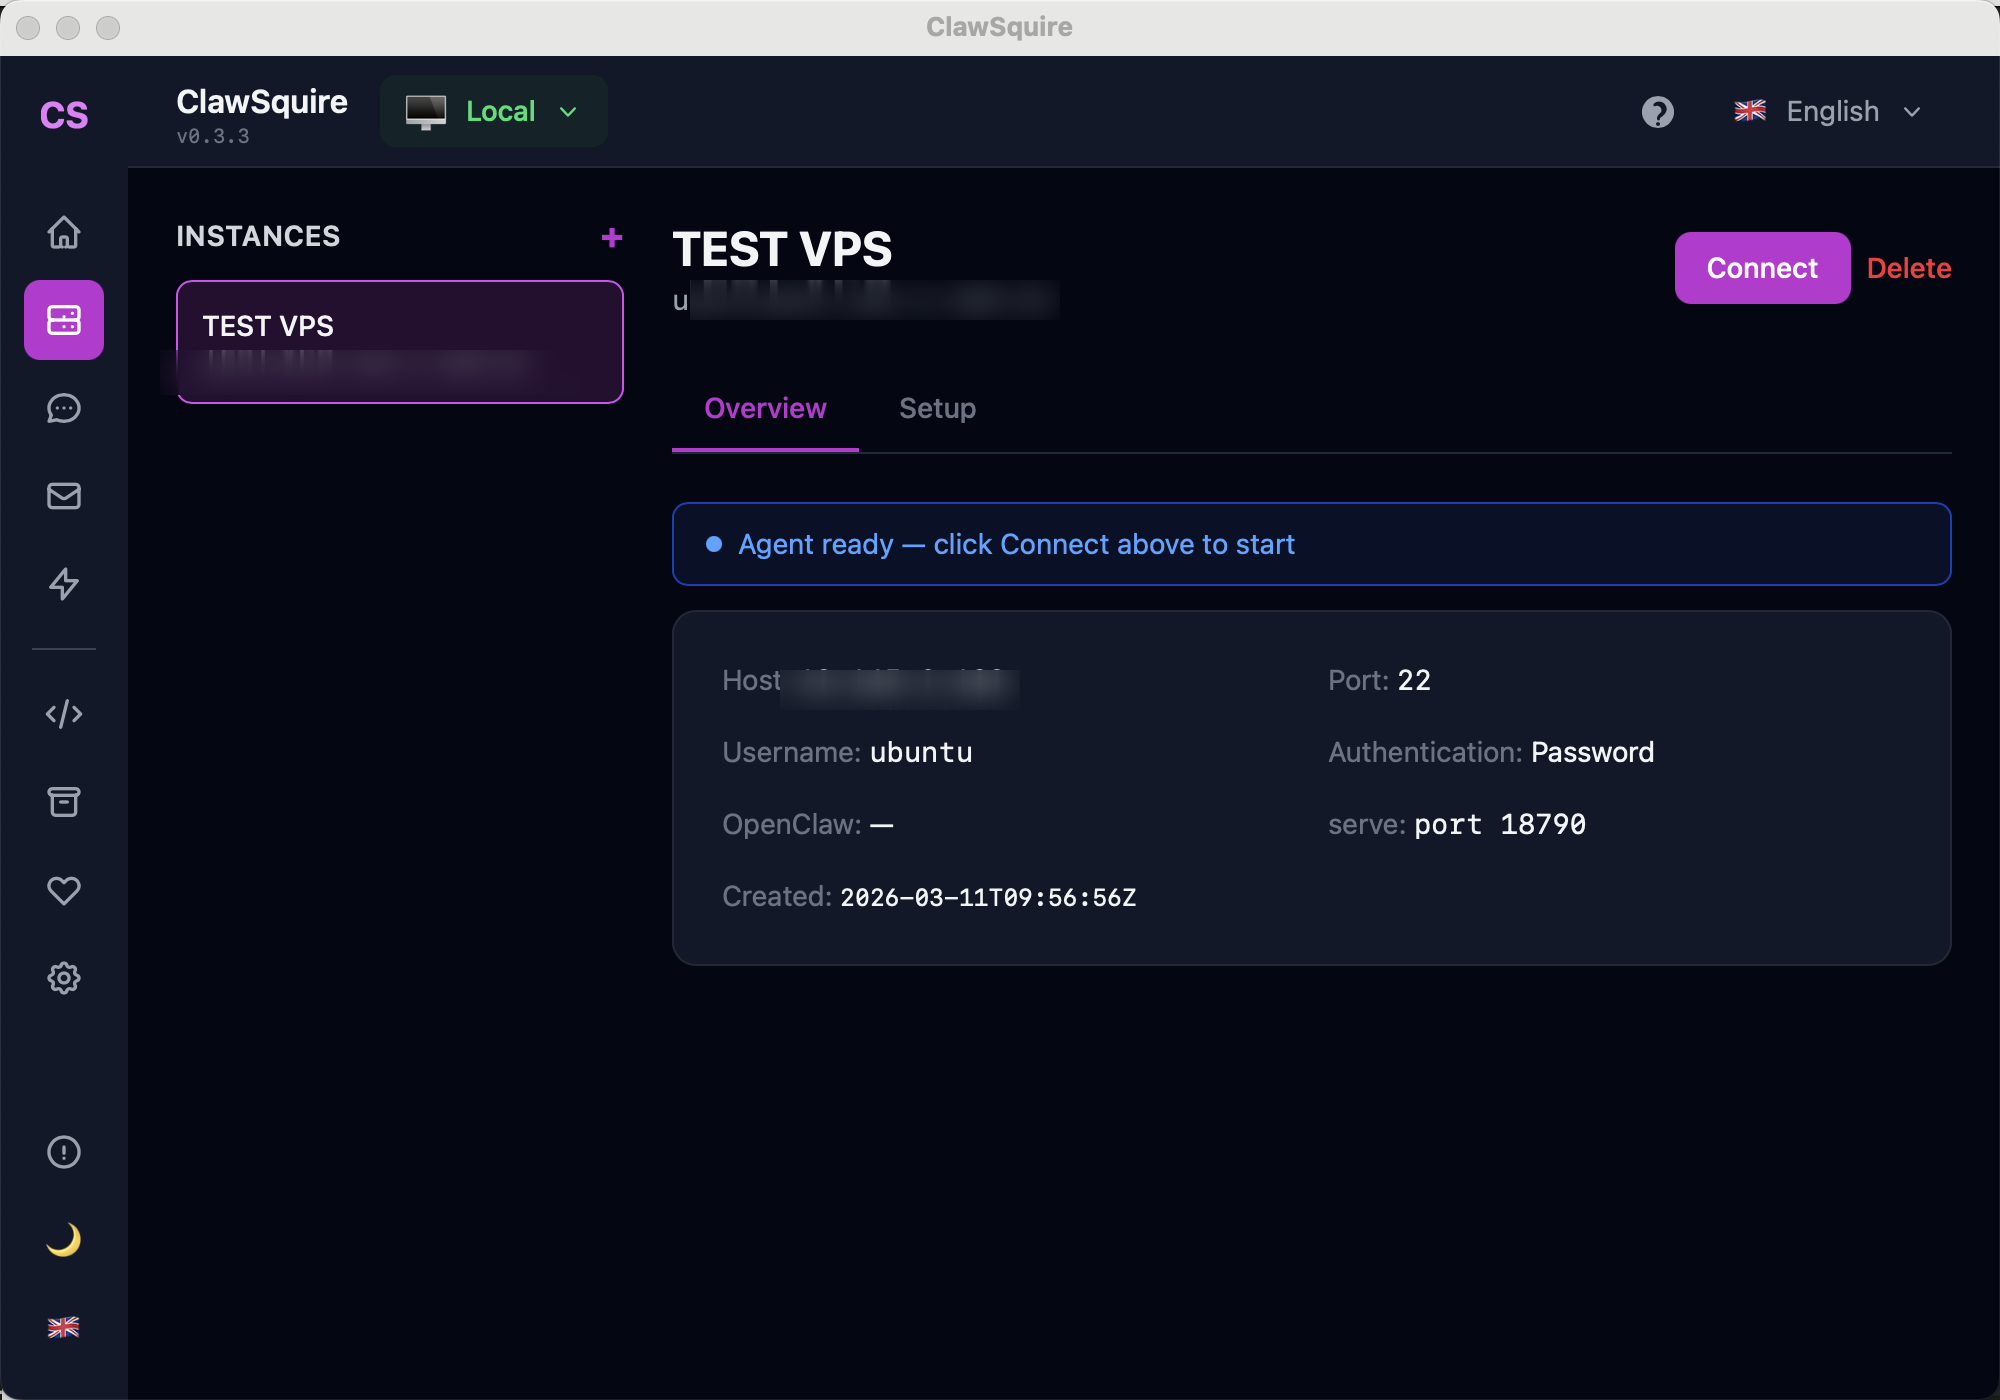
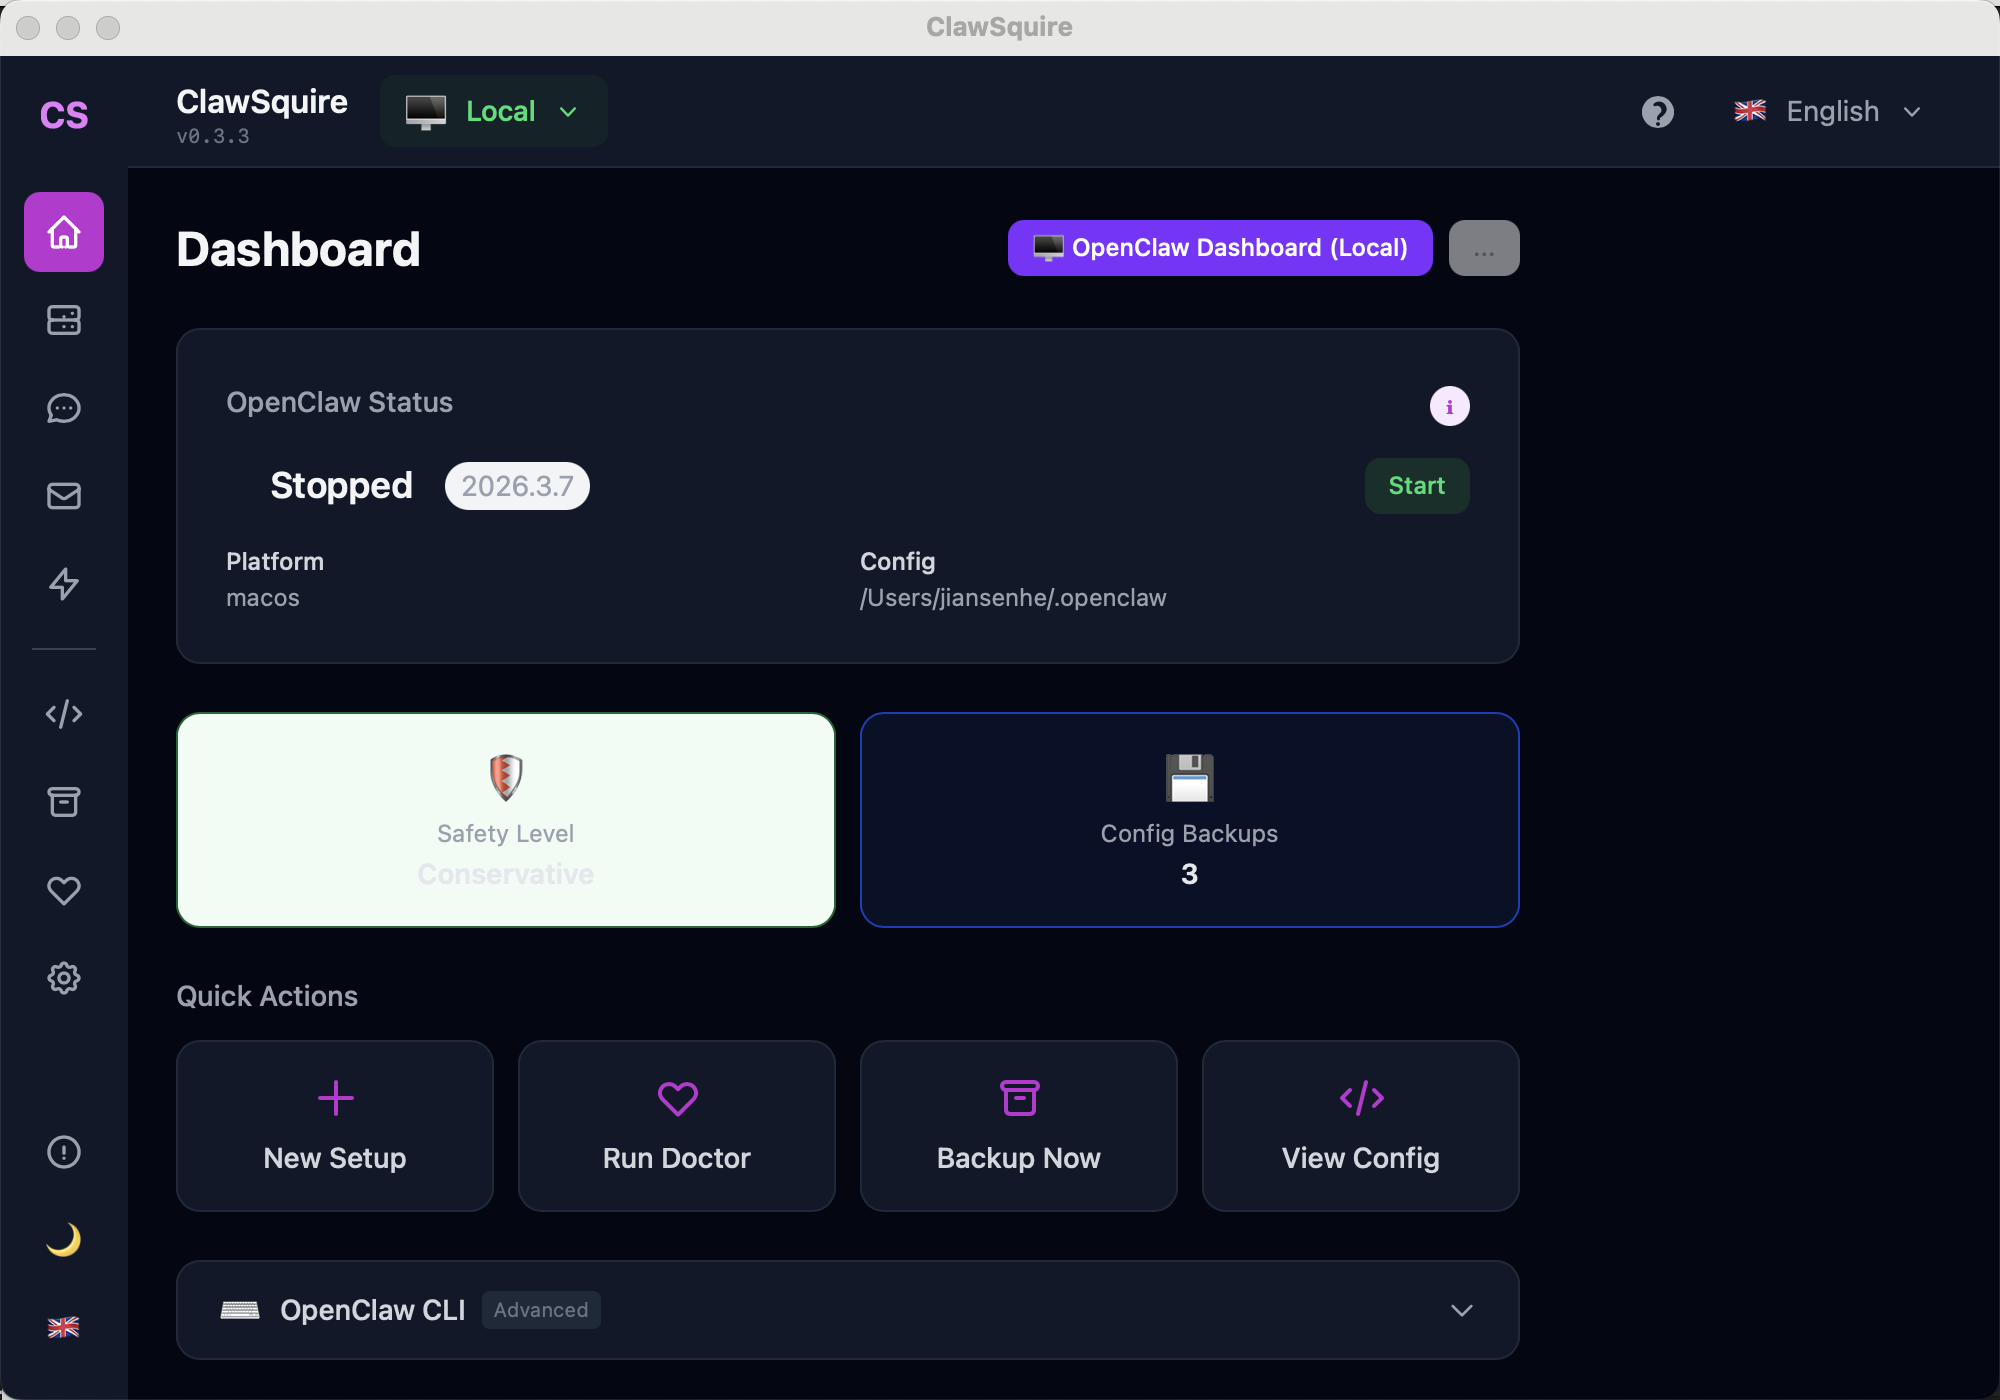
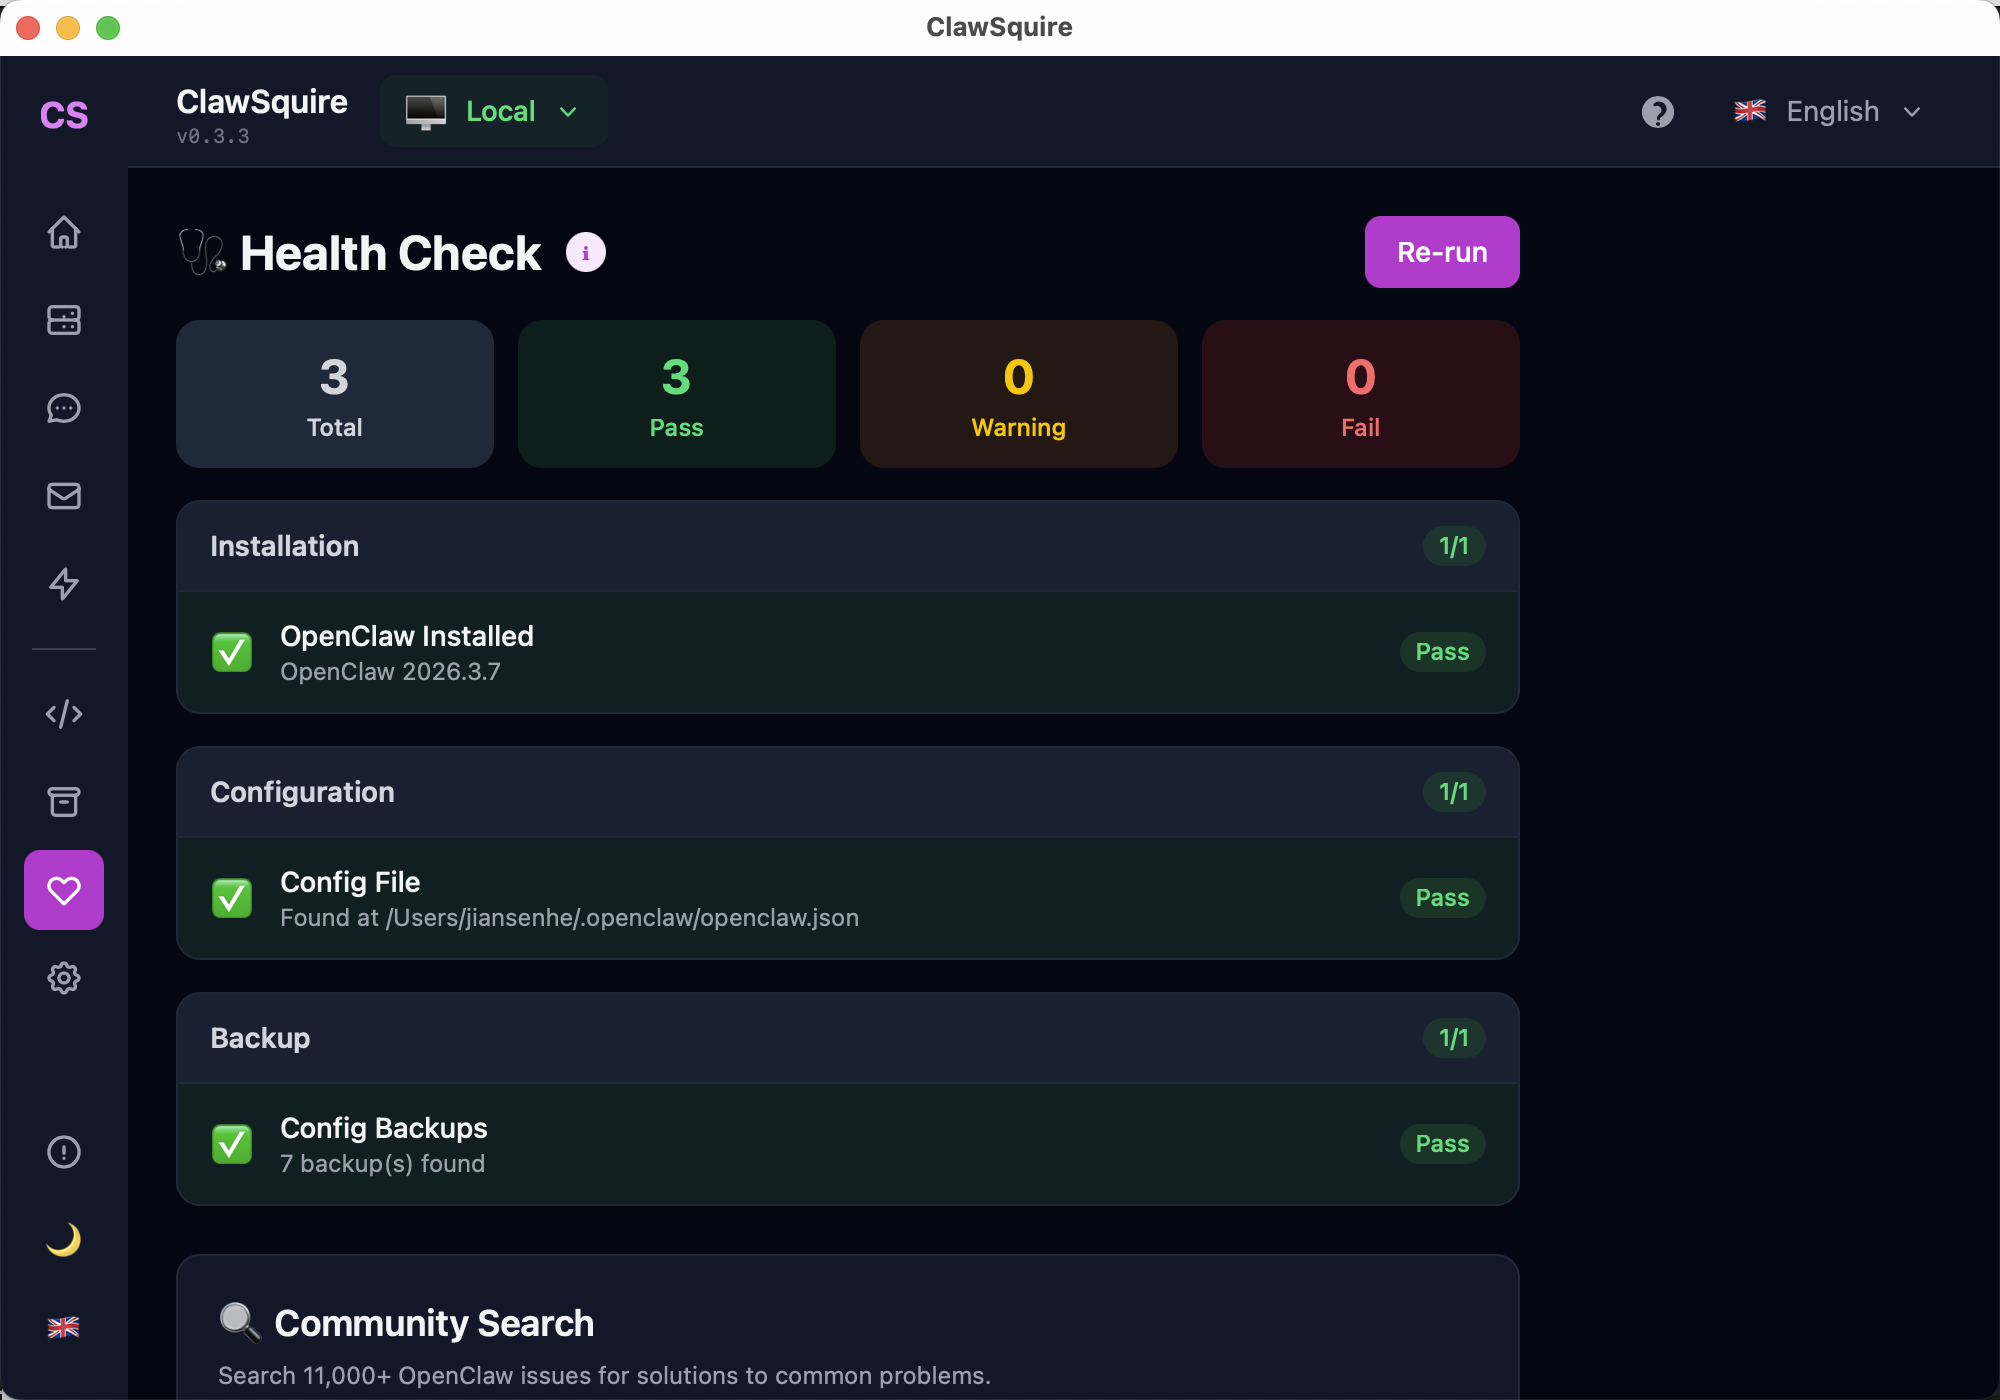
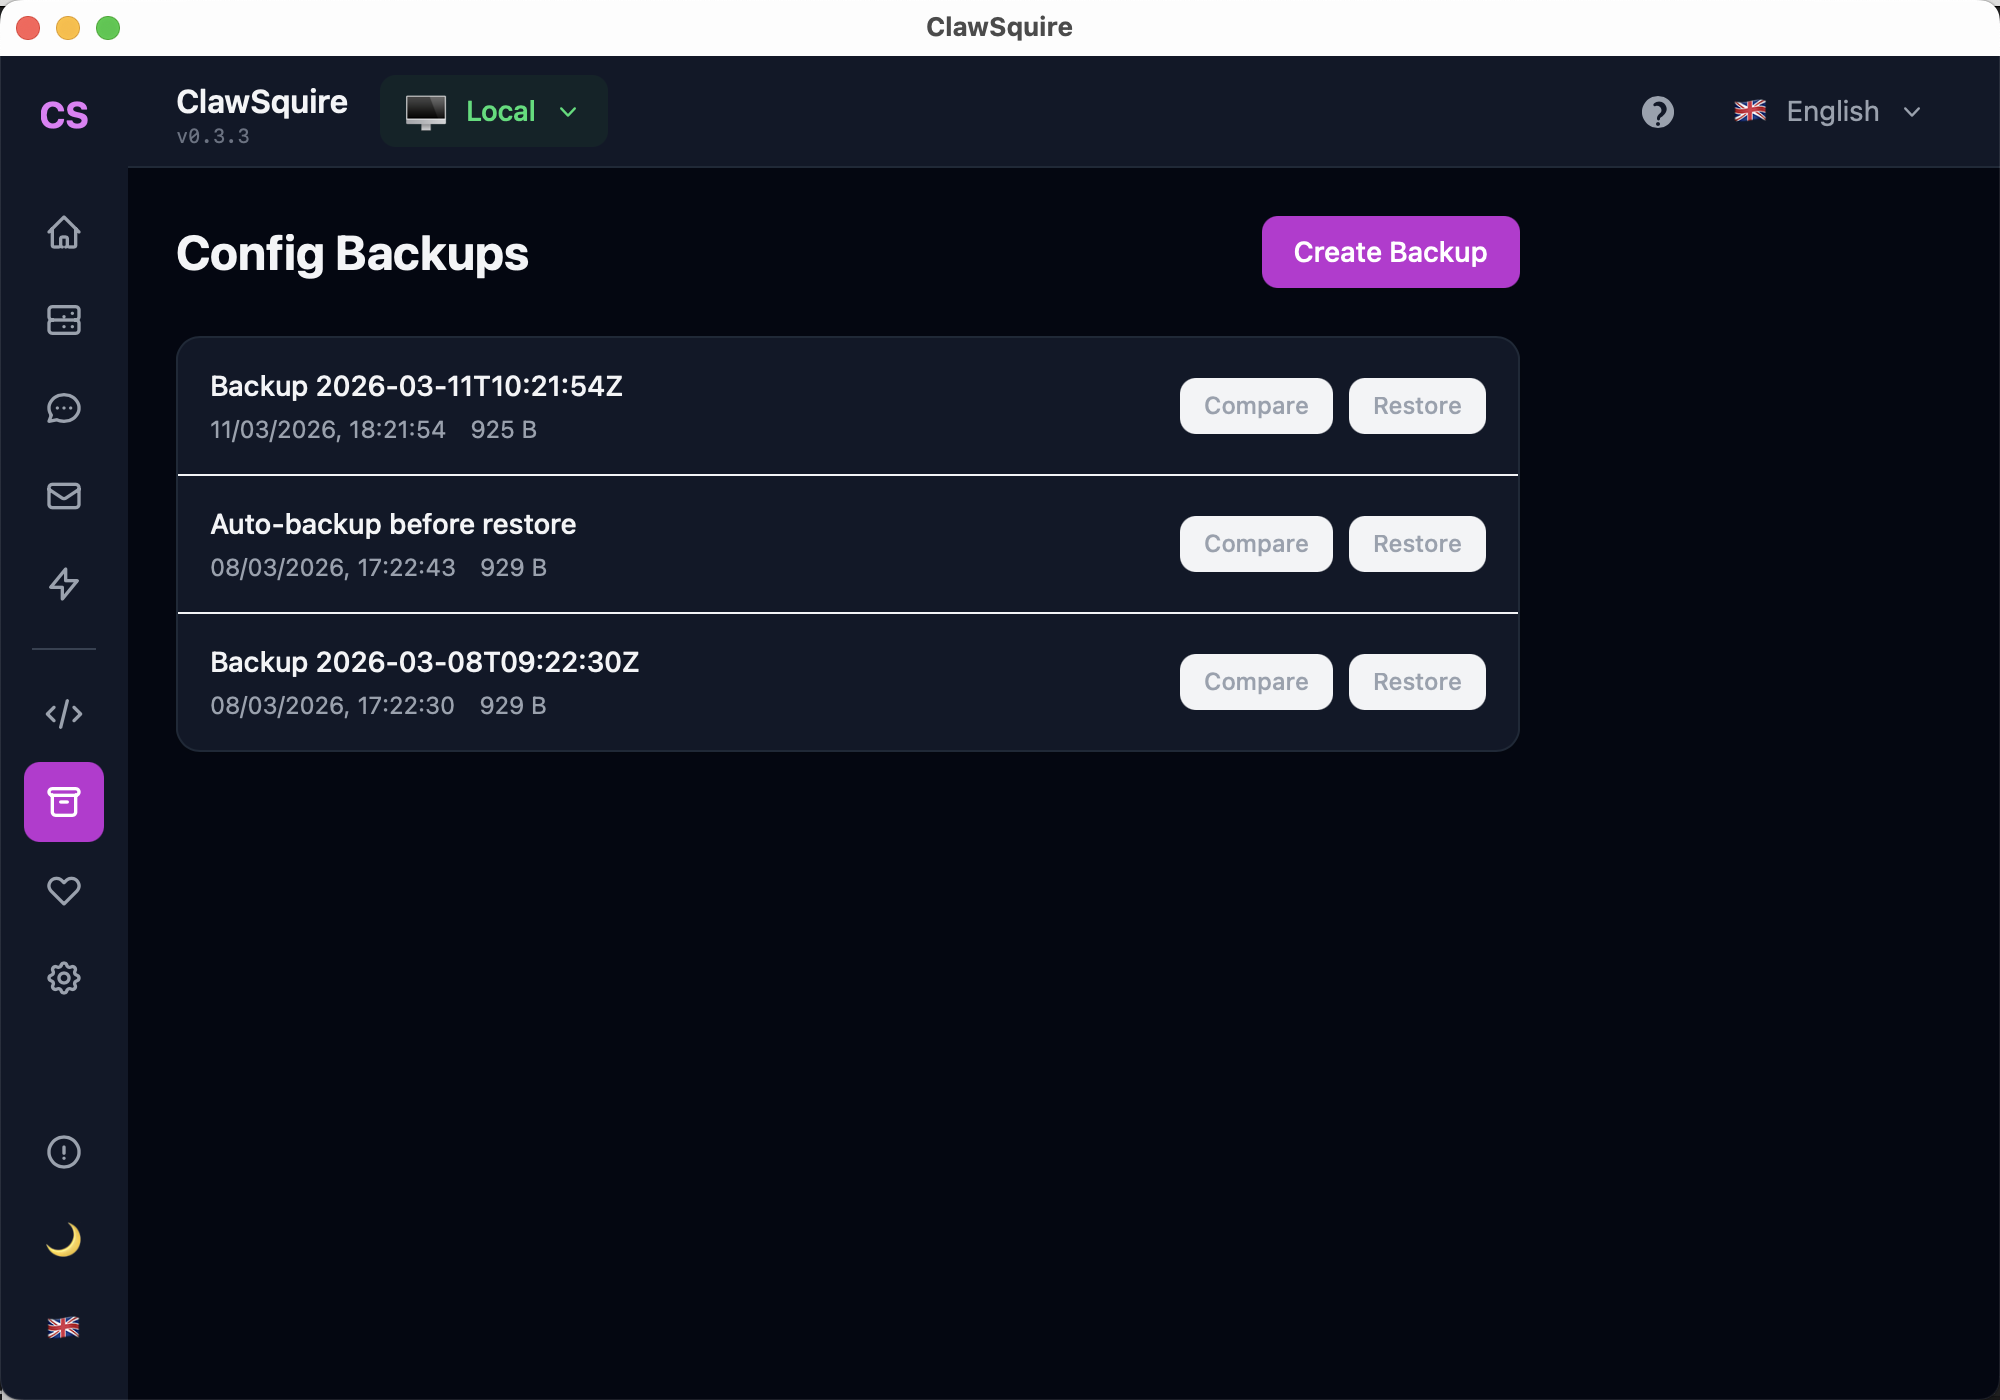
Manage Your VPS with ClawSquire
After installing OpenClaw on your VPS (steps below), use ClawSquire on your desktop to connect and manage it — no SSH commands needed after the initial setup.
Add your VPS once, then click Connect anytime. SSH tunnel is handled automatically.
See OpenClaw status, safety settings, config backups — everything at a glance.
Verify installation, config, and backup status after setup — one click.
Version your config before making changes. One-click restore if something breaks.
Prerequisites
- • VPS with Ubuntu 22.04+ (or Debian 12+, CentOS 9+, Amazon Linux 2023)
- • SSH access (password or key-based)
- • At least 1 vCPU + 1 GB RAM (2 GB recommended)
- • An LLM API key (DeepSeek, OpenAI, Anthropic, etc.)
⟩Setup Steps (~15 minutes)
SSH into your VPS
ssh user@your-vps-ipReplace user with your SSH username (often root or ubuntu) and your-vps-ip with the server's public IP.
Install Node.js 20+
OpenClaw requires Node.js 18 or newer. We recommend Node.js 20 LTS:
# Ubuntu / Debian
curl -fsSL https://deb.nodesource.com/setup_20.x | sudo -E bash -
sudo apt-get install -y nodejs

# Verify
node --version   # should print v20.x
npm --version
Alternative: using nvm (if you don't have sudo)
curl -o- https://raw.githubusercontent.com/nvm-sh/nvm/v0.40.3/install.sh | bash
source ~/.bashrc
nvm install 20
nvm use 20Install OpenClaw
npm install -g openclawVerify the installation:
openclaw --versionIf you see a permission error, use sudo npm install -g openclaw or configure npm to use a local directory: npm config set prefix ~/.npm-global.
Run initial setup
openclaw doctorThis creates your config file at ~/.openclaw/openclaw.json and checks all dependencies. Follow the prompts to add your LLM API key.
Or configure manually via CLI:
# Set your LLM provider (example: DeepSeek)
openclaw config set models.default "deepseek"
openclaw config set models.providers.deepseek.apiKey "sk-your-key"

# Verify config
openclaw config getStart as a systemd service (auto-restart)
Create a service file so OpenClaw starts on boot and restarts on failure:
sudo tee /etc/systemd/system/openclaw.service > /dev/null << 'EOF'
[Unit]
Description=OpenClaw Gateway
After=network.target

[Service]
Type=simple
User=YOUR_USER
ExecStart=/usr/local/bin/openclaw gateway
Restart=on-failure
RestartSec=5
Environment=NODE_ENV=production

[Install]
WantedBy=multi-user.target
EOFYOUR_USER with your actual username. Verify the path with which openclaw — if it's different from /usr/local/bin/openclaw, update the ExecStart line.sudo systemctl daemon-reload
sudo systemctl enable openclaw
sudo systemctl start openclaw
# Check status
sudo systemctl status openclawQuick alternative: screen / tmux
screen -S openclaw
openclaw gateway
# Press Ctrl+A then D to detach
# Reattach later: screen -r openclaw
Screen/tmux is fine for testing but doesn't auto-restart on crash or reboot.
Connect from your desktop
Easiest: Use ClawSquire
Open ClawSquire → click + New Setup → enter your VPS IP, SSH user, and password/key → click Connect. Done.
Or via command line:
# SSH tunnel (keep running)
ssh -NL 18789:localhost:18789 user@your-vps-ip

# Open in browser:
# http://localhost:18789Set up messaging channels
Connect your agent to Telegram, WhatsApp, or Discord. Use the Dashboard (via ClawSquire or SSH tunnel) or the CLI:
- → Connect Telegram — most popular, works immediately
- → Connect WhatsApp — scan QR code in Dashboard
- → Connect Discord — for community servers
VPS Provider Comparison
| Provider | Price (1GB) | Best For | Notes |
|---|---|---|---|
| Tencent Cloud | $3–5/mo | Asia-based users | Lighthouse is cheapest; good China/HK/SG latency |
| Hetzner | €4/mo | Europe-based users | Best price-to-performance ratio |
| AWS Lightsail | $5/mo | AWS ecosystem | Simple UI, global regions, included bandwidth |
| DigitalOcean | $6/mo | Developer experience | Clean dashboard, good docs, 1-click Ubuntu |
| Vultr | $6/mo | Global coverage | 32 locations, hourly billing |
OpenClaw needs 1 vCPU + 1GB RAM minimum. 2GB is recommended if running multiple channels. Prices are approximate as of March 2026.
Security Checklist
Frequently Asked Questions
SSH tunnel not working — can't reach Dashboard+
Gateway stops after SSH disconnect+
Telegram bot doesn't respond after VPS setup+
Which VPS provider should I choose?+
How much does it cost to run OpenClaw on a VPS?+
"Control UI requires device identity" when accessing Dashboard+
Can I run OpenClaw on a Raspberry Pi?+
Next Steps
- → Connect Telegram — chat with your AI on mobile
- → Connect WhatsApp — add WhatsApp channel
- → Dashboard Guide — learn all Dashboard features
- → Health Check — verify everything works
- → Set Up DeepSeek — configure the cheapest LLM
- → Fix Device Identity Error — if Dashboard shows HTTPS error
- → Search Community Issues — 11,000+ solutions
Guided VPS setup, health diagnostics, config backup — 7 languages.